Tuesday 30 March 2010

Is It Just Me.....?


Is it just me, or do you ever get the feeling that technology is laughing at you behind your back?
An interface that is giving me particular concern lately is the random Word Verification algorithm which allows for posting comments on other Blogsites.

After a day or so away in the realm of Real Life (tm), I like nothing better than to catch up on what the rest of the wargaming world has been up to, and in particular, look forward to seeing what my favourite Blogs have been producing whilst my back was turned.

This small and perfectly formed pleasure is much enhanced by the ability to post comments on what takes my fancy, and foist my opinions on unsuspecting others before they know what has hit them....

Now of course the Word Verification stuff is designed to prevent nasty Web robots from intruding and interfacing with real people like you and me, and so is definitely down on the Official List as a 'good thing'.....but.....

Is it just me or has anyone else noticed that the ostensibly randomly-generated verification words seem far from random....and in fact, seem a little bit ...well....judgemental?

This is a sampling of what I was forced to re-type today, it being a particularly busy evening of catch-up:

After a somewhat long comment offering my opinion on a continuing discussion: the word "Dullo" Hmmm.....

After offering my support, in what I thought was a genuine manner, to someone suffering a lead-mountain crisis:

"Insipidt" Curious.....

After linking my own Blog in a comment:

"Thasscrud" Curiouser......

Finally, when breezily and cheerfully wishing a fellow enthusiast success in a forthcoming project:

"Nosenzt" I kid you not.....

Is it just me, or is there a judgemental programmer out there laughing at me behind my back?

Not strictly gaming related, but something I can't help but notice recently.
By the way, I suggest you think twice if you are of a sensitive or paranoiac disposition before posting a comment in reply to this post- the Word Verification widget is waiting to pass judgement.....

:-).


Friday 26 March 2010

2mm Colonial: Work in Progress


Hello All, sorry to report that things have been a bit thin on the hobby front this month, with 'Real Life' (tm) getting far too much of a look-in; something I'm hoping to redress once we enter April.

So for now, apart from the suitably stirring postcard view of Bluejackets manning a Maxim Gun from the SteelonSand archive (it just struck me, wouldn't fancy sitting on that tiny board attached to the tripod when that thing was in full flow....vibrations can cause injury, you know!), we have a quick update on some test stands I'm working on.

First up, what do you get when you cross an Irregular Miniature's ABG15 Elephant and a BG28 six horse limber towing gun?


Why, you get that favourite 'must have' of British Colonial armies, the Elephant Gun of course!


A quick filing-off of the riders and flag from the Ancient's Elephant, and the removal of the limber horses gives you a good start; I've filed down the cannon at the rear, and intend to replace it with some pin or wire to represent a suitably hefty-looking 40lb cannon....and hopefully we should have something approaching the heaviest form of heavy artillery!

As to how the elephants and the limber/gun will be attached, I'm yet to come up with a good solution; perhaps some ultra-thin fuse wire might stand in as the hauling chains, whilst a bit of modelling putty could work as the blanket roll/harness on the pachyderms.
I may also add in another cut-down limber in between the rear elephant and the limber riders....might not want them sitting so close to the elephant's rear....

Finally, a couple of shots of a simple test-stand for Egyptian auxiliaries, or perhaps Mahdists; I went for the BG23 10 man skirmish infantry block for these, as they give a suitably irregular look - seen here with a mounted commander from a BG13:


Painting on the characteristic "I've been to Mecca and all I got was this lousy jibba" coloured patches was a bit of a stretch at this scale, but I think they turned out alright:


Obviously, if I were to expand into a Sudanese direction, these would need to be cranked out in mass production terms, but actually once the white has gone on, it's mainly the undercoat that does the talking...

So a quick squint at the rather measly WIP that is actually in progress, but as I said, hopefully lots more to come in the near future!

Thursday 18 March 2010

2mm Colonial: Test Stands


A quick run-through, now, for the test stands that have just been completed to give a flavour of the 2mm Colonial/Land Ironclads Armies project. As I said in a previous post, it's been a while since I've painted this size of minis, and at first, I couldn't help but think "Wow, these guys are small", but the more I did, the easier things became, so hopefully I'll be back in the groove soon!

You see above an as yet un-based Egyptian battalion, led by it's commander as it leaves camp; as I was basing things around 1882, we see the lovely white uniforms and red fez, rather than the later khaki - gotta have that splash of colour.
The flags are somewhat speculative, in that the only information I could find was the use under the british of green flags with the arabic regimental number in white; so these are just approximations; particularly given their size!
I think the white and red combo is quite effective on the table-top, although I might augment it with some blue coated guards, or even Ottoman troops for some variety.

Next up, we see the battalion drilling in square, this time accompanied by the Irregular BG6 Artillery stands, that I'm going to use as the Egyptian Krupp guns - they have a nice single trail suggestive of these:


Not to be outdone, we have some red-tunic British next, again in square, and accompanied by a pair of Royal Artillery guns formed by BG19s.
Although routinely, of course, British helmets and equipment were stained brown on campaign, I kept the home service white to add some visual clarity - otherwise things would probably look a bit muddy at 2mm in size:


The flags are a bit of a fudge, in that a battalion is unlikely to have carried four! I just wanted to try out how the Union and Regimental colours might look; the national flag is o.k., but the colours turned out looking a bit like a modern Macedonian flag...oh well...
Later battalions will probably just have a pair, whilst the other two blocks will have theirs filed off.

Having painted in the red tunics in the first instance, I realised that something seemed to be missing, and the figures somehow did not suggest the Colonial era - when I realised I would have to bite the bullet and depict the characteristic webbing straps to contrast with the uniform. These ended up being a pair of vertical white stripes on the back of the figure; whilst on the front merely a suggestion of some were done, given that they are competing for space with the face, rifle, etc.


Similarly, the Egyptians needed a contrasting black webbing, which has turned out alright, although is rather 'busy' in appearance; I'd unusually gone for a black rather than a grey undercoat on these figures (Yes, I'd run out of my normal Panzer Grau!), so there ended up being a lot of dark contrasty areas on these blocks, so much so that I decided not to line in a few rifles on the front of the stands, as more colour/paint would have been too much to bear.
I think at normal viewing distances, it should give the blocks some granularity, and a look of shade and light portraying depth.....at least that is what I am telling myself!


Moving on, we have a view of some Royal Artillery, both Horse (BG28) and foot (BG25) limbered batteries making their way past an Egyptian line:


The blue of the RA uniforms rather makes the whole appear a little dark, what with the horses and compact sculpting; hopefully the spots of white for the solar helmets and the light grey of the gun carriages will help to lift them somewhat.

Finally, we have some blocks of khaki-clad Bengal Lancers, doing their duty supporting the Infantry:


These turned out quite nicely, although to be honest, the Irregular sculpting here is very compact and small, so I found it hard to paint - lots of letting the undercoat doing the talking here, and hopefully diverting attention with those colourful lance pennons:


So, a good little exercise in remembering how to paint figures this small, and luckily a reminder of how much I like the finished product - really evocative, even on the small un-based scale shown here, of real formations seen from a Wargamer's eye view.
Hopefully lots more to come on this subject in future posts, with various other unit types, and of course some based-up completed stands - so stay tuned!

Thursday 11 March 2010

Pre-Dreadnought Photos: Part 8


An oriental flavour, this time, for some photographic views from the SteelonSand Pre-Dred miscellany, or 'box full of old stuff', as my significant other calls it.....

First up, we have a nice view of the Japanese 1st Class Torpedo Boat, the Fukuryu. She was around 42 meters long, and capable of speeds in the region of 20kt; armament two 47mm QF guns, and three 14" Torpedo Tubes. (The bow mounting can plainly be seen here)

What is perhaps more interesting about her is that she had a previous incarnation as the Chinese vessel the Fulong, part of the Beiyang Fleet. Built in Germany at Kiel in 1885, some sources credit her with damaging the Japanese Cruiser Matsushima at the battle of the Yalu, although I have been unable to get any confirmation of this. In any event, she was surrendered with the balance of the Chinese ships to the Japanese at Wei-Hai-Wei, and taken into service by the victors.
There is a good, quick summary of the Chinese Fleet available here:


Next another Torpedo Boat view, this time of the enigmatically named "Number 10", a shot with the weapon tubes plainly visible; nice pair of tandem funnels too:


She is likely a Third Class boat, as described here:


I recently came across an online modeller's reference which would definitely come in handy if considering painting vessels of this ilk for the table top:


Next up, we have the redoubtable Gunboat of 1889, the Oshima:


She was rather unfortunately sunk at the start of the Russo-Japanese war, when she collided with her comrade, the Maya Class Akagi on May 17th 1904.

A very useful site for contemporary reports on Pre-Dred activities, is the online archive of the New York Times; this allows you to search a database of all articles published thus far, and offers PDF scans of the original articles; here's a tidbit from 1905 (Just click on the button marked "View Full Article"):


Finally, we have a view of the grand-daddy of all Japanese Pre-Dreadnoughts, the immortal flagship of Admiral Togo, the Mikasa:


It would be nice to think that this is a picture taken at the time of Tsushima, but in all likelihood is probably a bit later in date, when her fame would warrant such photographic attention....

Of course, she is one of the very small list of original ships that remain preserved today around the world, and can still be visited, if you ever happen to be in Yokosuka!

A great site with a list of preserved Pre-Dreds can be found here:


All I need to do now is co-ordinate this list with my future holiday plans, without letting on to my aforementioned significant other......Well dear, how do you fancy St Petersburgh this year?.....or Piraeus, or even Portsmouth?!?...... :-)


Friday 5 March 2010

2mm: The Alamo


I thought I would take the opportunity to commemorate the anniversary of the heroic defence and fall of the Alamo in 1836 to showcase an old 2mm project of mine, in fact my first using miniatures of that size, namely a scratch built reconstruction of the Mission, and the forces at the time of the final assault by Santa Anna's Army.

Most of these photographs have been available to members of the 2mm Yahoo Group for the last couple of years, but I thought it would be an idea to show them to a wider audience; apologies to those of you who might have seen them before, but I hope they might in some small way go to show others what 2mm minis are capable of.

I had been trying to find an excuse for some time to try and make use of the 2mm troops from Irregular, when I hit upon the idea of re-creating the Alamo; it seemed to me that the cost and scale of 1/900th would make it easy to reproduce the end of the siege at 1:1 figure ratio, whilst allowing terrain that would not spread across acres of gaming table.

By restricting things to the final assault itself, troop types would necessarily be limited, as well as overall numbers, bearing in mind it was my first time at painting anything this small. Producing 180-odd Texians, and 1400 or so Mexicans would have been something I would have balked at even in 6mm, but seemed reasonable using the Horse and Musket range from Irregular.
Perusal of their catalogue had shown a number of well-sculpted cannon that would cover the Alamo's guns, and their Napoleonic era block formations would not be out of place for the self-styled Napoleon of the West's forces.
I initially had some concerns as to how to portray the necessarily 'individual' nature of the majority of the U.S., Texian and Tejano volunteers, but this was resolved by making use of the strips of dismounted dragoons available in the Renaissance range - no particular worries about uniform differences at this scale!

My overall aim was to portray the sweep of the whole battle, give a bird's eye view of the action as it were - I have always been a fan of the type of reconstructions you often see in museums, that are normally beyond the scope and budget of us ordinary mortals!

For the Alamo itself, I thought a scratch-build would play to the strengths of the tumble-down nature of the original - for which read- even my limited skills could have a good stab at portraying the buildings and walls! Indeed, I ended up using all sorts of rubbish and bits and bobs to produce it, but this some how gave a pretty good representation in the end, I think.

I was lucky enough to get an early copy of Todd Hansen's excellent "The Alamo Reader", which not only draws together all the original sources available on the epic story, but crucially has an excellent overview of the surviving contemporary plans and plats of the defences.

The actual appearance of the Mission at the time of the siege has always been a controversial and difficult subject, as well as being a developing science over the years, but recent scholarship has done much to give us a really good idea of what it would have been like.
I'm not saying that mine is in any way a true or even 'scale' model, as I was aiming at something that would work as a table top wargaming piece, but I tried to incorporate features that have been confirmed to have existed in recent years.

The superlative scale reconstruction and resulting book by Mark Lemon, "The Illustrated Alamo 1836", was actually in production whilst I was building mine, otherwise I would have had an even better source to follow, I suppose I could say 'great minds think alike'... :-)

Certainly, having bought this book subsequently, I would recommend it to anyone as The authoritative visual reproduction of the Alamo as it was; truly an amazing piece of scholarship and model making.

I started my plan with the idea that if a six foot man was represented by a 2mm high miniature, then 3 feet would mean 1mm in terms of ground scale, and this rather ignorant and clumsy appreciation of mathematical scaling actually ended up being not too bad in recreating the footprint of the mission itself, of course it soon became useless in making the actual height of walls and buildings look in any way meaningful against the 2mm figures, so I wimped out, and followed what looked right next to the minis rather than trying to be feet and inches accurate.

This attempt at in-the-dark geometry produced a ground footprint, with admittedly a few tweaks here and there to help with balance and proportion, and a set of buildings on a 31 by 24cm off-cut of hard constructional plastic that I happened to have lying around:


This gave some reasonable space to depict the immediate environs of the Mission complex, and have a go at the various watercourses and outerworks, without being too unwieldy as a terrain piece.
The buildings themselves were made with a bodge of off-cut foamcore, sprue, plastic, cardboard and paper; there are even some bits of band-aid as roofing, and the sound selector switches of a very old LP record player in there somewhere!
Steel pins and wire stand in for wooden logs and the fallen trees in the Abbatis, and some liberal smearings of filler add to the construction. I was in no way going to be able to represent accurately the iconic and intricate carved exterior facade of the Chapel, so chickened out and photocopied a drawing, which was then reduced and stuck on to the front!


(Remember, all photos on this Blog are 'clickable' for a large-scale Macro view)


Great liberties were taken with the actual placement of doors and windows, and some, at the time these pictures were taken, were very amateurishly daubed on...(I hasten to add these have been finessed somewhat since).
So she ended up pretty rough and ready, but hopefully represented the spirit of the original.


From the North Wall, now, and at Travis's battery, we get the first view of how those 2mm sized little men look in-situ. I found the dismounted dragoon strips, with a bit of filing down of headgear here and there, surprisingly good at depicting the defenders of the Mission, although of course I can't really claim to have painted in any racoon-skin caps or accurate New Orleans Greys uniforms.....


Hopefully you can imagine Crockett at the Palisade, whilst in the distance, you can spy the Pecan tree against the West wall:


Turning now to the Soldados of Santa Anna's forces, below we see the troops of General Cos's column of attack, awaiting the start of the pre-dawn assault. I wanted to try an echo the lines of troops drawn on the plan by Sanchez Navarro, which luckily were easily portrayed by the cast-together blocks from Irregular Miniatures.
Each block, under close inspection, has a certain number of individual figures sculpted into it, so I could be sure of getting a pretty accurate rendition of the 1400 or so who are thought to have made up the main assault force on the day itself. Principally, for instance, we can see 52 and 26 figure blocks for the various companies of Fusileros, with a screen of Cazadores Light Troops out in front:


A view from the South, during a re-fight of the battle using a modified version of the 2x2 Napoleonics rules, sees the various columns converge upon the defenders, Colonel Morales' Cazadores in evidence here:


So...let's take you to the early morning of the sixth of March 1836, when out of the darkness, from all directions, the Mexican army attacks the walls of the Alamo:


Alerted, some sources say, by the premature cheering of the advancing Soldados, an exhausted and weary defence rouses itself for the event they all knew was coming; certain death, and certain Glory:


In the face of musket and cannon shot, the Mexican troops courageously press forward until under the walls, and crucially, under the range of the muzzles of the Texian artillery, which could not be depressed down from the 'battlements' of the rather ad-hoc fortress:


It is a little unclear as to who broke into the defences first, but it seemed that the taking by coup de main of the Southwest corner and 18pdr gun position, was instrumental in cracking open the walls of the Mission:


From then on, sheer weight of numbers would begin to tell on the defenders, who could not engage without exposing themselves to counter-fire atop the parapet, which was in the main unprovided with adequate firing steps or crenellation. It is likely that in this way, William Barret Travis himself was killed, leaning out to shoot down on the enemy:


It was inevitable, perhaps, that the likely less than 200 defenders would never be able to hold the extended length of the Mission's walls against a more numerous foe:


Finally, desperately, the defenders were pushed away from the West and North walls, and corralled into the dead-end of the Long Barracks and the famous Chapel itself.


What terrible final moments resulted for all those who died, the surviving sources only hint at; what we know for sure is that it was a desperately close-fought and savage battle at close quarters, and the despotic command of Santa Anna himself had left little opportunity for clemency or mercy. Most of the garrison are thought to have been killed, with only a handful of the women and the black servant of Travis left alive to tell the tale.


The refight and game itself was instructive in that I think it backed up the opinion that the real defence must have been surprised by the Mexican assault - initially there were horrible casualties and morale issues when the cannon were allowed to play freely on the approaching assault. In the end, though, the numbers themselves told, and once the walls were penetrated, it was all over.

You'll have noticed that none of the strips and blocks of figures are based; this was merely in order to facilitate placing them properly inside the narrow confines of the defences, on what is, after all, a somewhat unique terrain piece and one-off project. I found it was a good introduction for what are both the weaknesses and strengths of 2mm miniatures, and hopefully these photos might encourage some more of you out there who are yet to give them a try, that they are really quite fun to work with.
For now though, on this anniversary of the epic defence of Texan liberty, I urge you all to:

"Remember the Alamo!"


(For those who might want to explore the battle and its context further online , an excellent discussion group on both history and current research into the battle, frequented by many noted authorities on the subject, can be found here:


an exploration of the many interesting topic threads can be very rewarding.)


Thursday 4 March 2010

2mm Colonial: More musings....


Things are beginning to firm up now, with regard to how I'm going to approach the Order of Battle for the 2mm Colonial Project I spoke about in my last post. Working with the 1882 Campaign in Egypt as a background, I've decided what units I'm going to tackle, and am now in the planning stage as to how these will appear on the tabletop.

This is a stage that I find is quite interesting, as it means sitting down and working through various combinations of real-world organisation alongside the minis available from Irregular, and above all, how these will combine to look good on the table top.
Did I just say interesting? What I actually mean is sometimes frustrating; in that there is always some element of compromise required to balance practicality, playability, and realism to make an effective whole.
Frustrating because this process rarely turns out the way you originally conceive it.....is that why so many of my projects go, to some extent or another, unfinished? :-)

First off, I've gone with a 40x20mm basing style, which is rather smaller than I have previously used with 2mm figures, but this is mainly so that I have some flexibility in depicting various formations on the tabletop. Principal amongst these is that emblem of the Colonial era, the British square, as seen in the photo above.

With British regimental organisation at this time favouring eight companies of around 120 men, I've decided to use a single Irregular Miniatures BG33 infantry in 2 ranks block on a 40x20 base, to depict a two Company frontage, so that the Regiment can be depicted as four two-company bases, which neatly combine to form the square as you see.
In terms of figure scale, this is of course, a bit of a fudge, in that the BG33 depicts 52 'figures', for 208 men, so I suppose 1:4.6-ish figure to man ratio, although in the field the total would have varied widely anyway, so I am trying to concentrate more on the sub-unit itself rather than the numbers that go to make it up.


The regimental bases will have an officers block in attendance, although in the final cut, this may be various combinations of the BG13 we see above with single standing figures cut from the ever-useful RBG11 Dismounted Dragoons strip.

For Cavalry, we have an organisation of four Squadrons, each with four Troops of approximately 40 men each. This translates to four strips on a base for each Squadron, giving four bases per Regiment:


Above we can see BG10 Lancers, with 6 figures per strip, giving a total of 96 figures. This may be out ratio-wise if compared to the infantry bases, but as I say, I'm moving away from that to concentrate more on how the sub-units can interact on the table top this time around.
The balance as above, I think, should work well, breaking down into individual Squadrons if needs be, and allowing depiction of line, column etc, alongside the infantry.
A couple of Squadrons will even fit inside a Regimental square, just ready to break out when the enemy line wavers!

Moving on to the Artillery and support troops bases, there are some further complications, in that although a gun based singly would fit nicely at each corner of a square, I think to show something that looks like a Battery, a pair of guns and limbers is the minimum.

Furthermore, in order to show troops such as Rifles, and in particular the Naval Brigade, I would like to introduce some measure of 'irregularity' to their ranks so as to contrast them with infantry of the line, and reflect their ability to skirmish.


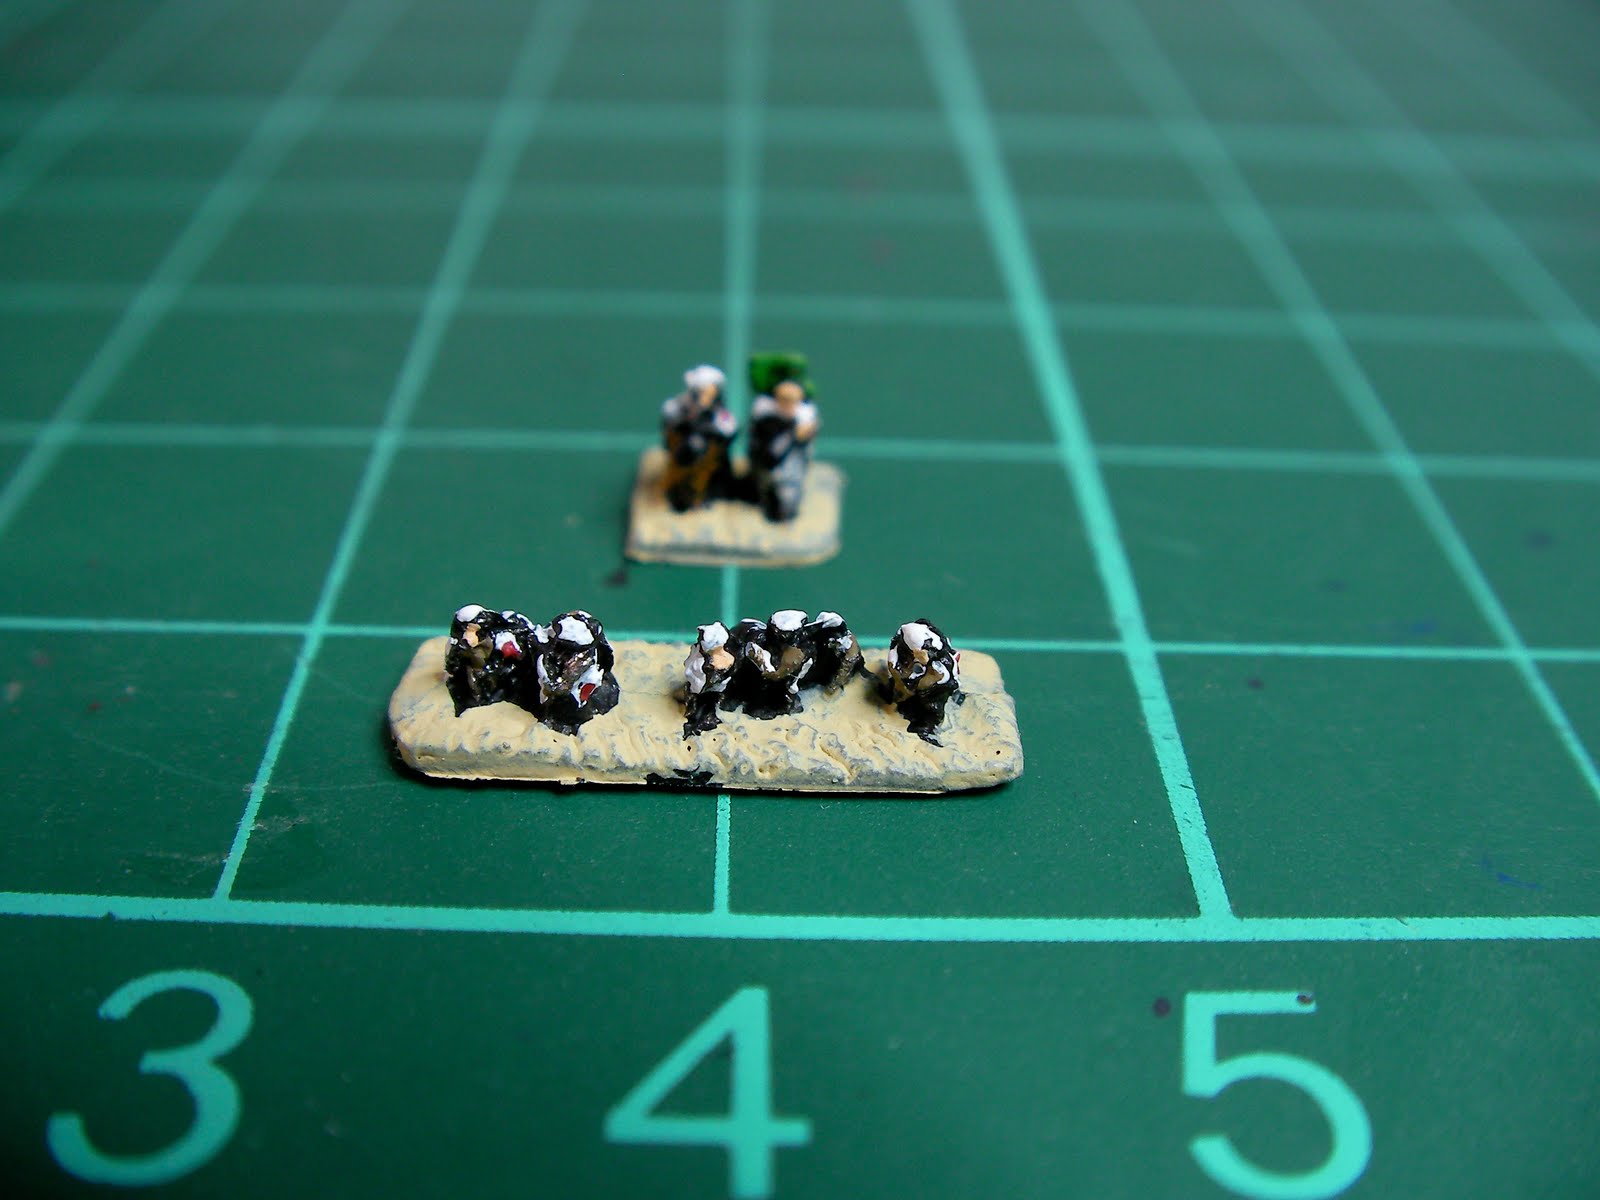
Above, lower left, we can see a deployed infantry base, made up of a single BG14 infantry in two ranks block, and three each of BG3 skirmish figures, backed by a standing line of the RBG11, to give a firing line in front.
This should hopefully look more offensive and business-like for troops that might be deployed on the flanks, or for skirmishing in front of the main line. I see the 60th Rifles and the Naval Brigade with at least four of these bases each.

The Artillery has a Royal Artillery Battery of deployed guns, with two BG19 side by side, whilst I think the Royal Horse Artillery to accompany the Cavalry will best be shown limbered, with a transverse base as seen behind of two BG25.

These then, will be the basic building blocks of the project, that will see the addition of irregular infantry and cavalry which might support the Egyptian regulars, or be proto-Mahdists; probably using some horse units from the Ancients range, and the BG23 Loose Order Infantry stand of 10 men. These could be based on double depth bases to give more of a horde-like appearance.

The overall Order of Battle will be as follows:

Egyptians: 2 Infantry Regiments, 1 Regiment of regular Cavalry, a battery of guns, auxiliaries

British in red tunics: 2 Infantry Regiments, 3 Squadrons of Household Cavalry

British in Khaki: 2 Infantry Regiments, 1 Regiment of Lancers, a Mountain Battery

British Cavalry Regiment (Hussars) in blue tunics.

The Naval Brigade, bluejackets and maxim guns; siege train

6oth Rifles in green tunics

2 Batteries Royal Artillery, 1 Battery Royal Horse Artillery.

Hopefully this will give a flavour of the era of Tel-El Kebir 1882, whilst retaining the ability to be used in both earlier and later conflicts.

There should be some test stands done over the weekend, to see how all this will shape up when painted and based, so stay tuned for some photos in the near future...